Welcome to The Helpful Art Teacher, an interdisciplinary website linking visual arts to math, social studies, science and language arts.

Learning how to draw means learning to see. A good art lesson teaches us not only to create but to look at, think about and understand our world through art.

Please click on my page to see my personal artwork and artist statement: http://thehelpfulartteacher.blogspot.com/p/the-art-of-rachel-wintembe.html

Please contact me at thehelpfulartteacher@gmail.com. I would love to hear from you.

Sunday, January 30, 2011

Atmospheric Perspective continued... trees in a field of snow


Please click here to read my post Atmospheric Perspective before you begin this project.

You will need some paper, a pencil, some paint brushes, two small bowls and some black acrylic paint.

Start out by drawing a few trees for practice on a separate piece of paper.

For this project you will need to know how to make trees without leaves. Use this worksheet to learn how:


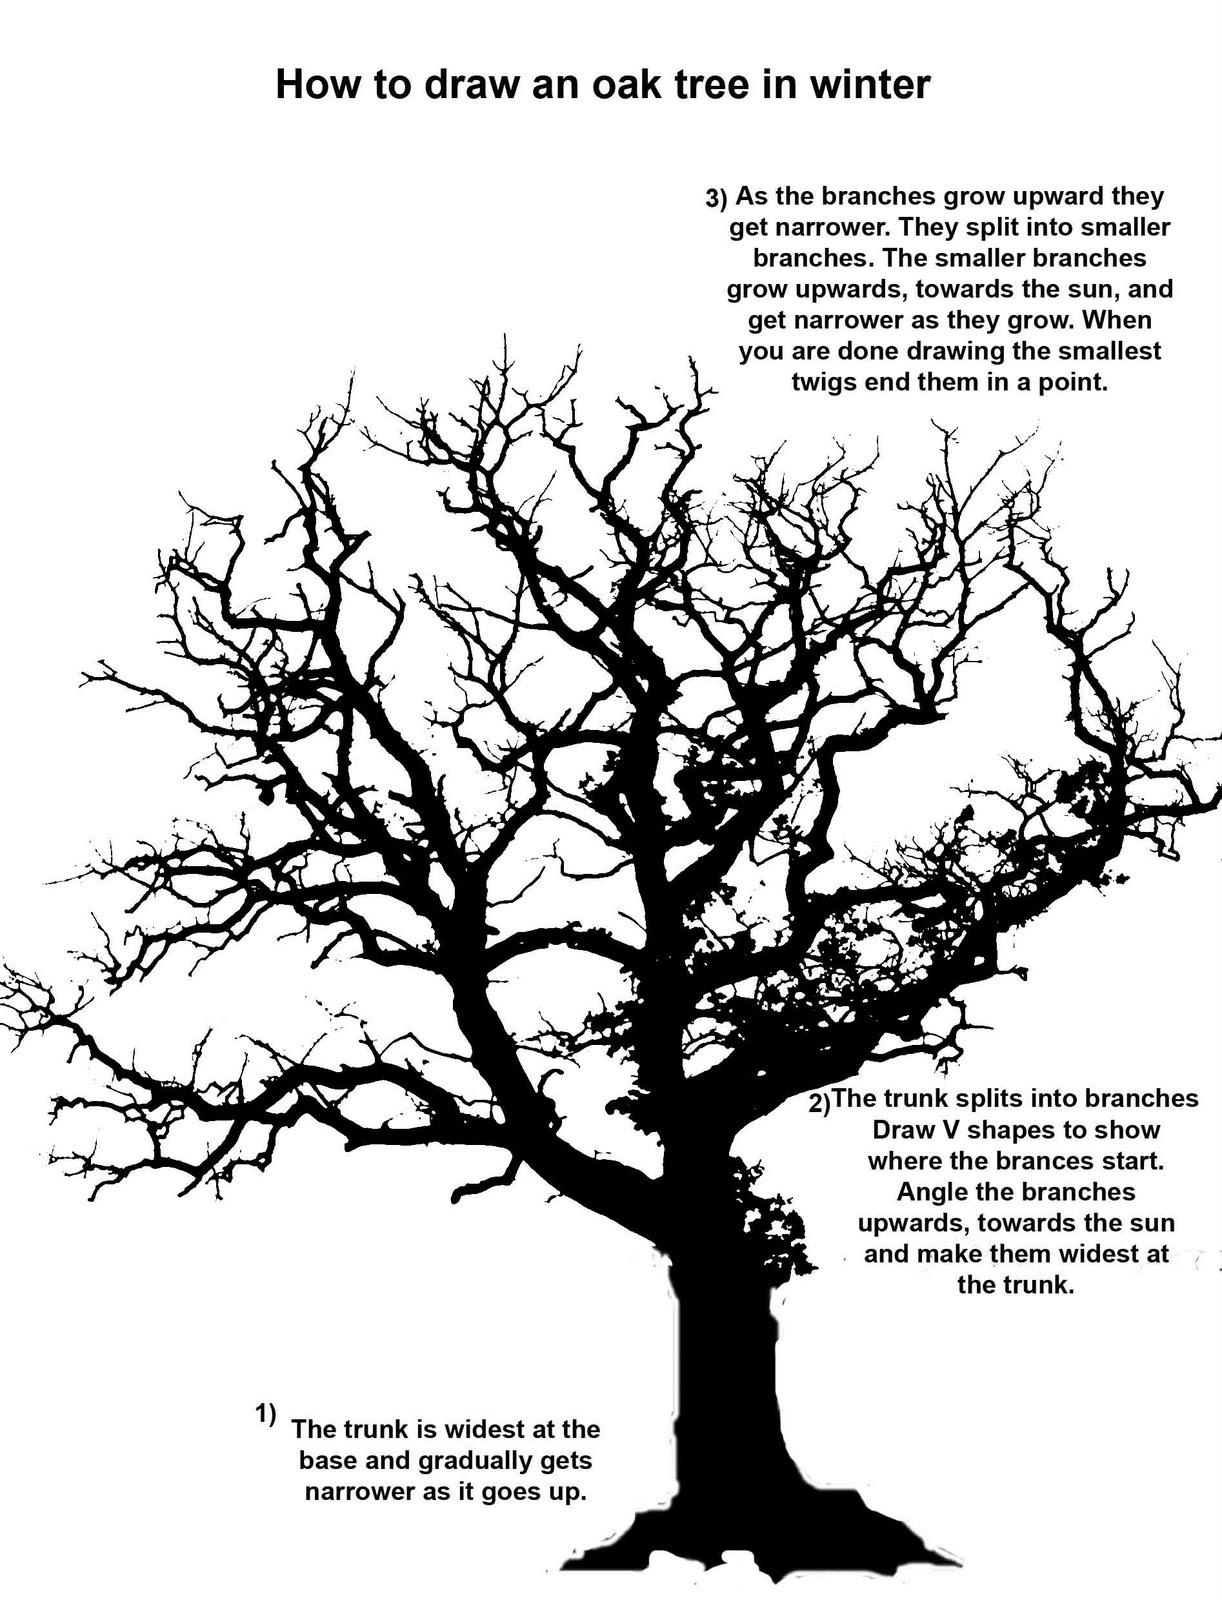
You can draw all of the trees below
(or make up your own) 
by following the same basic formula:


Now you are ready to paint.
Spread newspaper on your work surface.
Get out a clean sheet of paper and pour some acrylic paint into one bowl. Fill the second bowl with water.

Here is a basic selection of
watercolor brushes:

Dip your mop brush into the water and then stir it in the black paint. Go back and forth between the water and the paint until the water is dirty and the paint is watery.

You will use the paint for the trees in the foreground and the gray, dirty water for the trees in the background.


Load your detail or mop brush and start at the bottom of the page. Press the brush down and lift it up as you paint in an upward motion to create the trunk of the tree.


If you always start your brush stroke at the bottom and lift your brush slightly off the page as you paint upwards, the trunk and branches will automatically become narrower as they grow upwards.


Use your gray water to paint the horizon in light gray.
Use your black paint to create your first tree. Start at the bottom of the page. Make the tree overlap the horizon line.
Add your next tree higher on the page. Make it smaller than your fist tree. Use the gray water, not the paint, for the second tree.


Continue to add trees. Each new tree should start higher on the page and be smaller than the one in front of it. Make the trees in the background lighter and less detailed than the trees in the foreground.


Helpful Hint:
If you wish to create trees with leaves on them, add the leaves using a dry sponge dipped in a small amount of paint. You can also add leaves using a fan brush. practice creating leaf textures,using various brushes,
on a separate piece of paper.


Atmospheric perspective
 in photography, painting and print making


An Oak Tree in Winter
By William Henry Fox Talbot
J. Paul Getty Museum, Los Angeles
   
Waiting for Guests at Lamplight by Ma Lin
 

Layered Mountains and Dense Woods
Zhuran, 10th century


Lovely, Dark and Deep
 by Rachel Wintemberg (The Helpful Art Teacher)


 Woods on a Snowy Evening By Rachel Wintemberg
 (The Helpful Art Teacher)
  

Brooklyn Museum: New Year's Eve Foxfires at the Changing Tree, Oji, No. 118 from One Hundred Famous Views of Edo
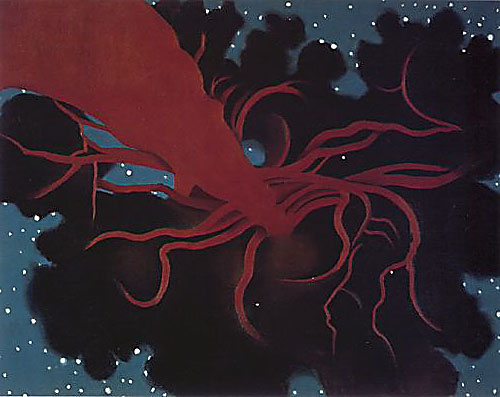
New Year's Eve Foxfires at the Changing Tree
Woodblock print  By Hiroshige 
 Brooklyn Museum
Click here to read the mythical story of this mysterious picture

Saturday, January 29, 2011

Paint the sky: Silhouettes and sunsets

PAINTING THE SUNRISE, THE SUNSET
 AND TWILIGHT


USE THESE HELPFUL WORKSHEETS
IF YOU DO NOT KNOW
HOW TO DRAW TREES


Paint your trees black

 On watercolor paper or illustration board, use waterproof ink or diluted acrylic paint.

On canvas board use acrylic paint.

It is very important to choose a waterproof media for the trees. Set your picture aside and let the trees dry.

After you have allowed your black tree silhouettes to dry, decide on a color scheme for your sky.

IMPORTANT:
Before painting your sky,
Click here to read my post, color theory 101 and
Click here to read my post on Impressionism
Pick a dominant color scheme for your sky

 If you are painting a sunrise or sunset,
choose predominantly warm colors


If you are trying to capture the colors of twilight, try using predominantly cool colors:


If you are using both warm and cool colors, paint the cool sections of your picture first
(leave the sections where you plan on painting your warm colors white until your entire painting is dry).

 When it is time to add your warm colors, start with a clean palette to avoid unwanted color combinations.

Use enough water when painting your sky
to create smooth brush strokes. 

Keep some newspaper handy and test out your brush on it to control the amount of paint and water you are using.

 Start at the edge of the trees and
paint away from the branches.

Use a square shading brush to create clean edges.

 Use horizontal brush strokes to depict a calm sky


Use diagonal brush strokes to depict a windswept sky


You can completely alter the mood of your painting by the colors you choose and the direction of your brush strokes.
Watch the video below to learn why sun rises and sunsets look different:


When you are done with the sky, allow your painting to dry once more and then use black paint, one last time, to touch up your silhouettes.


To learn how to create the pine trees, practice painting the trunks on a piece of scrap paper. Then dry brush the branches and needles using a fan brush for texture. Keep in mind that the branches get smaller the higher you go, forming a rough, irregular triangular shape and not a perfect, sculpted and trimmed Christmas tree shape (trees in a wild landscape aren't manicured by gardeners). Compare your brushwork to photographs of real trees until you are happy with the results. 

Here are some of my reference photographs of skies that you can use to create your background.

Aliciasmom's sky reference photos album on Photobucket

The Sky reference photograph album uses Flash player and may not be visible on some mobile devices. To view the slide show on a mobile device, click here.


Millet was Van Gogh's favorite artist. Van Gogh did not copy Millet's Starry Night. He gazed at the night sky and painted his own picture based on his own feelings and his own experiences. We cannot go outside at night to look at the night sky in art class but we can use the 'star walk' app on the classroom iPads to see what the sky would look like right now if it were a clear night with no light pollution. Can you create your own personal 'Starry Night'? How do artists learn from other artists without copying? How do artists develop their own ideas from observation and experience? 
http://vitotechnology.com/star-walk.html

Each individual artist, Looking out at the night, will see something different. What do you see when you look at the evening sky? How will your painting look?
Georgia O'Keeffe, The Lawrence Tree, 1929


Nocturne, James McNeill Whistle circa 1870-1877 

Watch the video below to discover how the silhouette of a distant planet, as it orbits a far away star, teaches scientists about alien solar systems


 Gallery
Acrylic paintings by 7th grade students


Student Gallery 2013
5th-8th grade students


Student Gallery 2017, Grade 8 bilingual students:


Using Adobe Photo Shop
to plan your color scheme


Unfinished Student Painting

Selection Tool:Highlights
Gradient Tool:Warm Colors

Selection Tool: Highlights
Gradient Tool:cool colors